Decoupage: Martha Stewart's method to make us feel inferior.
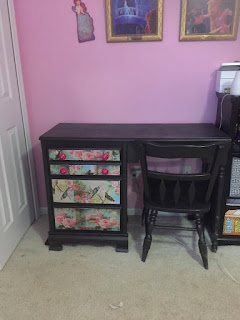
From the second a friend gifted us this desk for my daughter, I had a mental picture or how it would look when it was done. It would be a decoupage masterpiece ... even though I had never attempted decoupage before a day in my life. While I am very pleased with the end result, I won't lie and say the process was an easy one. It was one of trial, error, and enough bad words to make a trucker blush.
 |
| A glimpse of the final result. |
 |
| The before! |
For this project I used:
-Spray on primer
-Spray paint in your choice of color. I chose matte black.
-Painters tape
-Decoupage paper
-Mod Podge
-Mod Podge Acrylic Spray Finish
-Spray-on matte finish
 |
| The beginning was easy. Spray on primer. I won't lie. This led me into a false sense of security. |

When I sprayed on my color I taped off the front of the drawers where I planned to decoupage. Spray paint can have a tacky finish, and I was worried this would prevent me from getting the smooth finish I needed.
Then ... the decoupaging began. For those of you that have never used decoupage paper before, a little warning. When it's wet, it's as pliable as wet Kleenex. Seriously, you can have it just about perfect and one wrong bump will shred the entire thing to ribbons. Which is what happened to me, and resulted in an impressive string of expletives. I intended flat sheets of one image, but ended up having to piece it together to get a good finish. I have been told my people more familiar with decoupaging that more layers of paper give a better end result. That's a hearsay tip, since I haven't utilized that approach. Instead, I hodge podged my Mod Podge (see what I did there?) and the result was cute.
No, this project didn't end perfectly. But, that's half the fun of DYI projects--the little flaws that give them character. What matters most is that my daughter loves it, and that makes this refinishing mama smile!
Have you tried a decoupage project? I would love to see it!


Comments
Post a Comment