Second desk to the right, and straight on until morning
This is it, kids. The project that prompted friends to ask me to begin this blog. My daughter's Neverland desk. I won't lie, this is one of my favorite projects because it's so insanely unique, just like the little peanut I made it for. From beginning to end, this endeavor was a lengthy one, so let's dive right in!

For this item you will need:
-A desk ... of course
-Spray paint of your color choice
-Chalk paint of your choice
-Mod Podge Waterbased Sealer, Glue & Finish
-Matte Finish Spray
- Sandpaper or Sanding Square
-Design paper to decoupage

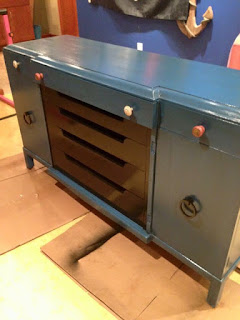
Here's our before. As this is an antique, it did require some wood glue, screws, and WD-40 to get it in shape before I prettied it up. Make sure you handle these repairs upfront, so they don't mess up your completed design down the road.

Primer, primer. Almost always step one! I love spray on primer, because proper application gets a smooth, flawless finish.
 |
| Add your color! I chose spray paint for the metal parts of the desk in a robin's egg blue. |
 |
| For the wooden sections, I sponged on chalk paint in a soft white. |


This is the part where you get to be creative and decide what kind of design you want to decoupage on the top of your desk. I used normal printer paper to print out various maps of Neverland. While my desk paint was drying, I dipped the maps in a tea soak, let them dry, then burned around the edges to give them a worn, piratey look. IF you decide to utilize a method like this, PLEASE be safe. I worked cautiously and carefully over a giant bowl of water, having it at the ready to prevent any incident or emergency.
 |
| Once my paint was dry, I took a sanding square to the edges. |
 |
| This gives it a rustic look that I felt added to the Neverland feel. |

Now, on the decoupage! With a foam sponge brush a coat of Mod Podge onto your design pieces, then sent them in place. Secure them there with a second coat brushed over top. You will want to have a delicate touch with this. When the paper gets damp, it can get fragile and tear. Dab on, if need be.


Once all your pieces are set, I give them a bit of time to dry to avoid any ripping that could occur. After that, coat them with another heavy coat of the Mod Podge. You can really cake it on thick here. It will dry clear, and serves to protect your design. Below is a look at the liberal slathering I put on.


Now it's time to begin sealing! I sprayed on three coats of Mod Podge Super Hi-Shine Sealer over just the decoupage parts, followed by three coats of Matte Finish spray over the entire piece.

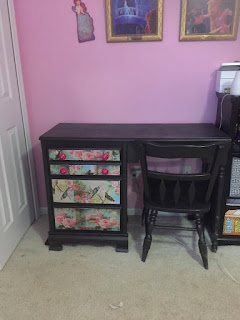
A final look at our finished beauty that would make Peter Pan and The Lost Boys proud!

Comments
Post a Comment