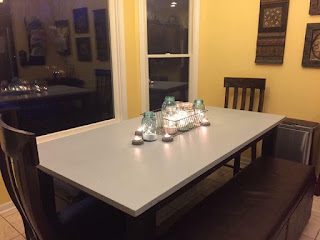
I chickened out, but the result was pretty.
The relationship I had with my dining room table was a bitter love/hate one. I loved the size of it. Perfect for large groups, wrapping presents on, our doing crafts with the kids. But, I hated the grooves in the top! Crumbs and crud were always getting caught in them, which made me feel like the table was never clean. I needed a fix, and toyed with the idea of doing a cement top on it, because I LOVE the cement counter top look.
I wanted it. I needed it. I ... chickened out.
So scared was I of ruining my table that I decided to work with products I knew and understood, namely plaster and paint. What resulted is a faux cement finish that looks great and was easy to create!
Step one was to use my spackling and putty knife to fill in those lines and crevices I hated so much. I won't lie, it was SO rewarding to clean the out for the last time and cover them up! The thing I like about the DryDex spackle is that it goes on pink, then dries white. This way, you know for sure when it's dry, and kind of feel like you're performing a magic trick along the way. Once the spackling was dry, I used the sandpaper to lightly sand it to a smooth finish.
Prime, prime, prime! You're going to put a lot of work into a project, make sure it sticks by coating it with primer first.
First coat of chalk paint. I have said this before in previous blogs, but I will share this tip again. When I use chalk paint, I always apply it with a handled sponge. This gives it a beautiful texture, and better coverage than you can get by rolling or brushing it on.
After three coats of the chalk paint, I then used a foam brush to cover the table with NUMEROUS coats of the FolkArt wax. This is the step that seals it, and considering it is a table that's going to have food spilled and slopped on it, I wanted it good and protected. (My sweet little angel babies are notoriously messy eaters)
A second picture of the finished project. I achieved the cement look I wanted, without the stress of a masonry project. The hate is finally gone, and I love my refinished table!


Comments
Post a Comment